Category Archives: Knowledge Base

Combining ARCore tracking and Cardboard Spatial Audio

This week Google released ARCore, their answer to Apple’s recently published Augmented Reality framework ARKit. This is an exciting opportunity for mobile developers to enter the world of Augmented Reality, Mixed Reality, Holographic Games, … whichever buzzword you prefer.

To get to know the AR framework I wanted to test how easy it would be to combine it with another awesome Android framework: Google VR, used for their Daydream and Cardboard platform. Specifically, its Spatial Audio API. And despite never having used one of those two libraries, combining them is astonishingly simple.

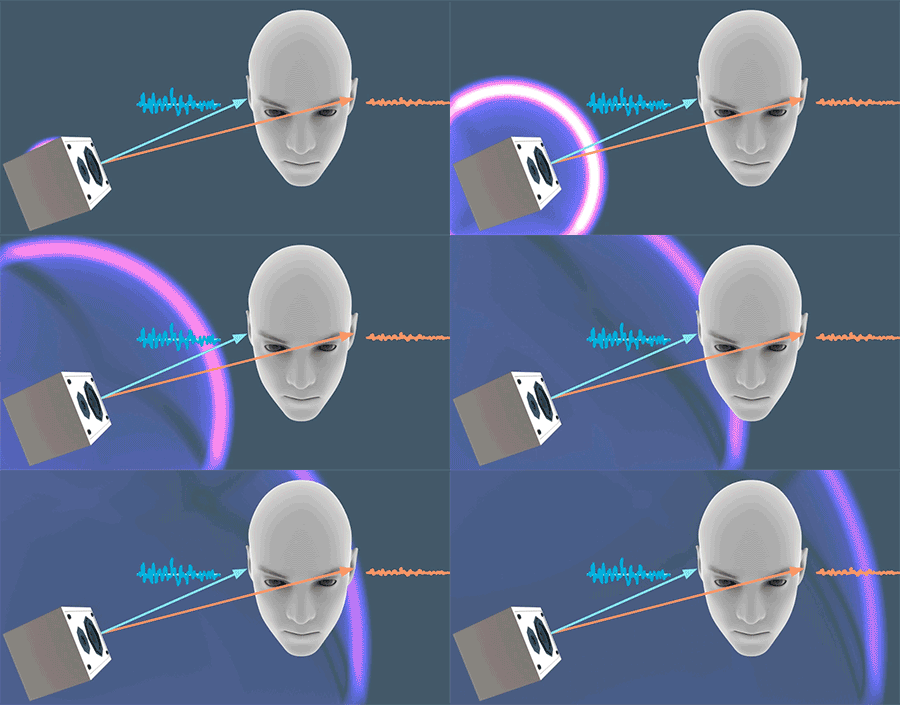
Cf. to https://developers.google.com/vr/concepts/spatial-audio

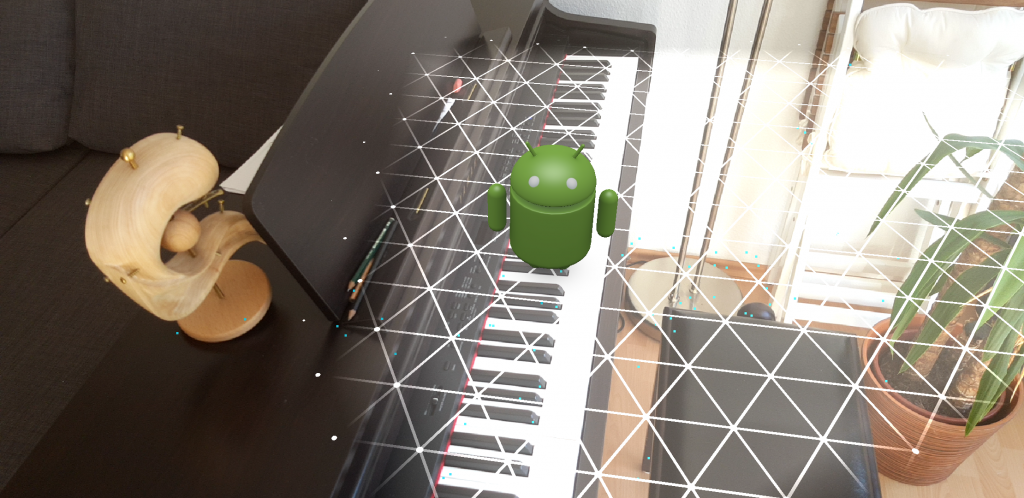
The results:

The goal is to add correctly rendered three dimensional sound to an augmented reality application. For a demonstrator, we pin an audio source to each of the little Androids placed in the scene.
Well, screenshots don’t make sense to demonstrate audio but without them this post looks so lifeless 🙂 Unfortunately, I could not manage to do a screen recording which includes the audio feed.

The how-to:

  1. Setup ARCore as explained in the documentation. Currently, only Google Pixel and the Samsung Galaxy S8 are supported so you need one of those to test it out. The device coverage will increase in the future
  2. The following step-by-step tutorial starts at the sample project located in /samples/java_arcore_hello_ar it is based on the current Github repository’s HEAD
  3. Open the application’s Gradle build file at /samples/java_arcore_hello_ar/app/build.gradle and add the VR library to the dependencies
    dependencies {
        ...
        compile 'com.google.vr:sdk-audio:1.10.0'
    }
    
  4. Place a sound file in the asset folder. I had some troubles getting it to work until I found out that it has to be a 32-bit float mono wav file. I used Audacity for the conversion:
    1. Open your Audio file in Audacity
    2. Click Tracks -> Stereo Track to Mono
    3. Click File -> Export. Select “Other uncompressed files” as type, Click Options and select “WAV” as Header and “Signed 32 bit PCM” as encoding

    I used “Sam’s Song” from the Ubuntu Touch Sound Package and you can download the correctly converted file here.

  5. We have to apply three modifications to the sample’s HelloArActivity.java: (1) bind the GvrAudioEngine to the Activity’s lifecycle, (2) add a sound object for every object placed into the scene and (3) Continuously update audio object positions and listener position. You find the relevant sections below.

    public class HelloArActivity extends AppCompatActivity implements GLSurfaceView.Renderer {
        /*
        ...
        */
        private GvrAudioEngine mGvrAudioEngine;
        private ArrayList<Integer> mSounds = new ArrayList<>();
        final String SOUND_FILE = "sams_song.wav";
    
        @Override
        protected void onCreate(Bundle savedInstanceState) {
            /*
            ...
             */
            mGvrAudioEngine = new GvrAudioEngine(this, GvrAudioEngine.RenderingMode.BINAURAL_HIGH_QUALITY);
            new Thread(
                new Runnable() {
                    @Override
                    public void run() {
                        // Prepare the audio file and set the room configuration to an office-like setting
                        // Cf. https://developers.google.com/vr/android/reference/com/google/vr/sdk/audio/GvrAudioEngine
                        mGvrAudioEngine.preloadSoundFile(SOUND_FILE);
                        mGvrAudioEngine.setRoomProperties(15, 15, 15, PLASTER_SMOOTH, PLASTER_SMOOTH, CURTAIN_HEAVY);
                    }
                })
            .start();
        }
    
        @Override
        protected void onResume() {
            /*
            ...
             */
            mGvrAudioEngine.resume();
        }
    
        @Override
        public void onPause() {
            /*
            ...
             */
            mGvrAudioEngine.pause();
        }
    
        @Override
        public void onDrawFrame(GL10 gl) {
            // Clear screen to notify driver it should not load any pixels from previous frame.
            GLES20.glClear(GLES20.GL_COLOR_BUFFER_BIT | GLES20.GL_DEPTH_BUFFER_BIT);
    
            try {
                // Obtain the current frame from ARSession. When the configuration is set to
                // UpdateMode.BLOCKING (it is by default), this will throttle the rendering to the
                // camera framerate.
                Frame frame = mSession.update();
    
                // Handle taps. Handling only one tap per frame, as taps are usually low frequency
                // compared to frame rate.
                MotionEvent tap = mQueuedSingleTaps.poll();
                if (tap != null && frame.getTrackingState() == TrackingState.TRACKING) {
                    for (HitResult hit : frame.hitTest(tap)) {
                        // Check if any plane was hit, and if it was hit inside the plane polygon.
                        if (hit instanceof PlaneHitResult && ((PlaneHitResult) hit).isHitInPolygon()) {
                            /*
                            ...
                             */
                            int soundId = mGvrAudioEngine.createSoundObject(SOUND_FILE);
                            float[] translation = new float[3];
                            hit.getHitPose().getTranslation(translation, 0);
                            mGvrAudioEngine.setSoundObjectPosition(soundId, translation[0], translation[1], translation[2]);
                            mGvrAudioEngine.playSound(soundId, true /* looped playback */);
                            // Set a logarithmic rolloffm model and mute after four meters to limit audio chaos
                            mGvrAudioEngine.setSoundObjectDistanceRolloffModel(soundId, GvrAudioEngine.DistanceRolloffModel.LOGARITHMIC, 0, 4);
                            mSounds.add(soundId);
    
                            // Hits are sorted by depth. Consider only closest hit on a plane.
                            break;
                        }
                    }
                }
                /*
                 ...
                 */
                // Visualize planes.
                mPlaneRenderer.drawPlanes(mSession.getAllPlanes(), frame.getPose(), projmtx);
    
                // Visualize anchors created by touch.
                float scaleFactor = 1.0f;
                for (int i=0; i < mTouches.size(); i++) {
                    PlaneAttachment planeAttachment = mTouches.get(i);
                    if (!planeAttachment.isTracking()) {
                        continue;
                    }
                    // Get the current combined pose of an Anchor and Plane in world space. The Anchor
                    // and Plane poses are updated during calls to session.update() as ARCore refines
                    // its estimate of the world.
                    planeAttachment.getPose().toMatrix(mAnchorMatrix, 0);
    
                    // Update and draw the model and its shadow.
                    mVirtualObject.updateModelMatrix(mAnchorMatrix, scaleFactor);
                    mVirtualObjectShadow.updateModelMatrix(mAnchorMatrix, scaleFactor);
                    mVirtualObject.draw(viewmtx, projmtx, lightIntensity);
                    mVirtualObjectShadow.draw(viewmtx, projmtx, lightIntensity);
    
                    // Update the audio source position since the anchor might have been refined
                    float[] translation = new float[3];
                    planeAttachment.getPose().getTranslation(translation, 0);
                    mGvrAudioEngine.setSoundObjectPosition(mSounds.get(i), translation[0], translation[1], translation[2]);
                }
    
                /*
                 * Update the listener's position in the audio world
                 */
                // Extract positional data
                float[] translation = new float[3];
                frame.getPose().getTranslation(translation, 0);
                float[] rotation = new float[4];
                frame.getPose().getRotationQuaternion(rotation, 0);
    
                // Update audio engine
                mGvrAudioEngine.setHeadPosition(translation[0], translation[1], translation[2]);
                mGvrAudioEngine.setHeadRotation(rotation[0], rotation[1], rotation[2], rotation[3]);
                mGvrAudioEngine.update();
            } catch (Throwable t) {
                // Avoid crashing the application due to unhandled exceptions.
                Log.e(TAG, "Exception on the OpenGL thread", t);
            }
        }
        /*
         ...
         */
    }
    
    
  6. That’s it! Now, every Android placed into the scene also plays back audio.

Some findings:

  1. Setting up ADB via WiFi is really helpful as you will walk around a lot and don’t want to reconnect USB every time.
  2. Placing the Androids too close to each other will produce a really annoying sound chaos. You can modify the rolloff model to reduce this (cf. line 71 in the code excerpt above).
  3. It matters how you hold your phone (portrait with the current code), because ARCore measures the physical orientation of the device but the audio coordinate system is (not yet) rotated accordingly. If you want to use landscape mode, it is sufficient to set the Activity in the manifest to android:screenOrientation="landscape"
  4. Ask questions tagged with the official arcore tag on Stack Overflow, the Google developers are reading them!

War stories: When the visual debugger fails you

I recently had a very strange crash and after some digging I found the lines I suspected the bug to lurk around. They looked something like this:

    const std::string contents = readFile("myFile.txt");
    const std::vector<std::string> lines = utils::split(contents, "\n");
    for (std::string line : lines) {
        if (line.empty()) {
            continue;
        }
        //...
        // Do something elaborate with the line, e.g. printing to console
        std::cout << "<line>" << line.c_str() << "</line>" << std::endl;
    }

The crash occurred in the //... lines because the line was not empty. Wait – what? I tested for emptiness before!
Opening the debugger revealed the following strange situation:

and the above small sample file prints on my (Windows) console:

<line>First line</line>
<line>third line (second one is empty)</line>
<line>fourth line</line>
<line></line>

Scrolling trough the commit history, the problem turned out to be introduced with this change:
OLD CODE (working):

std::string readFile(const std::string& fname, bool binaryMode = false)
{
    std::ios_base::openmode mode = std::ios_base::in;
    if (binaryMode)
        mode |= std::ios_base::binary;

    std::ifstream ifs(fname, mode);
    if (!ifs) {
        throw std::exception(("Couldn't open file: " + fname).c_str());
    }
    return std::string(std::istreambuf_iterator<char>(ifs), std::istreambuf_iterator<char>());
}

NEW CODE (not working):

std::string readFile(const std::string& fname, bool binaryMode = false)
{
    std::ios_base::openmode mode = std::ios_base::in;
    if (binaryMode) {
        mode |= std::ios_base::binary;
    }

    std::ifstream in(fname, mode);
    if (!in) {
        throw std::exception(("Couldn't open file: " + fname).c_str());
    }

    // Used C++ style reading which is more efficient than using stream buffer iterators
    // http://insanecoding.blogspot.de/2011/11/how-to-read-in-file-in-c.html
    std::string contents;
    in.seekg(0, std::ios::end);
    contents.resize(in.tellg());
    in.seekg(0, std::ios::beg);
    in.read(&contents[0], contents.size());
    in.close();

    return contents;
}

The problem was that reading the file with the more efficient solution resulted in the string having a bunch of null terminators if the file contained a new-line in the end. Obviously, .empty() returns false, so the check passed. As a side note: to simulate my crash bug by showing an unexpected console output, I had to pipe the C-string. When piping the C++ string, the line is printed with some whitespaces.

This is how I fixed it:

std::string readFile(const std::string& fname, bool binaryMode = false)
{
    std::ios_base::openmode mode = std::ios_base::in;
    if (binaryMode) {
        mode |= std::ios_base::binary;
    }

    std::ifstream in(fname, mode);
    if (!in) {
        throw std::exception(("Couldn't open file: " + fname).c_str());
    }

    // Used C++ style reading which is more efficient than using stream buffer iterators
    // http://insanecoding.blogspot.de/2011/11/how-to-read-in-file-in-c.html
    std::string contents;
    in.seekg(0, std::ios::end);
    contents.resize(in.tellg());
    in.seekg(0, std::ios::beg);
    in.read(&contents[0], contents.size());
    in.close();

    if (binaryMode) {
        return contents;
    }
    else {
        // Depending on the file, the last line might contain one or more \0 control characters. Remove them
        return contents.erase(contents.find_last_not_of('\0') + 1);
    }
}
Logo of the git version control system

Git stop words

If you add development code lines to your file which must not be committed to the code base (e.g. temporarily disabled code, fixated variables, noisy outputs), mark them with the word NOCOMMIT by putting it in a comment, a variable name, …

if(true) {//NOCOMMIT counter > 5 && testThis)
    myNewFeatureToTest();
} else {
    someOtherCode();
}
int NOCOMMIT = 5;
int myVariable = 1;
myVariable = 5; //NOCOMMIT

To activate instant rejection by git as soon as you try to commit this code, do the following:

1. Put this helper script in the file your repository checkout/.git/hooks/showlinenum.awk
2. and the following hook in the file your repository checkout/.git/hooks/pre-commit:

#!/bin/sh
#
# Dismisses the commit if it adds illegal statements (see variable $searchPhrase)

if git rev-parse --verify HEAD >/dev/null 2>&1
then
    against=HEAD
else
    # Initial commit: diff against an empty tree object
    against=4b825dc642cb6eb9a060e54bf8d69288fbee4904
fi

# Redirect output to stderr.
exec 1>&2
# ""
# Test for NOCOMMIT and other typical debugging lines
searchPhrase='NOCOMMIT\|(true ||\|(true||\|(false &&\|(false&&'

DIR=$( cd "$( dirname "${BASH_SOURCE[0]}" )" && pwd )

. git-sh-setup  # for die
git-diff-index -p -M --cached $against -- | $DIR/showlinenum.awk show_path=1 | grep -E '^.+[0-9]+:\+' |
grep "$searchPhrase" && echo "" && die Rejected commit since the above lines contain illegal statements. Use git commit -n to ignore

# If there are whitespace errors, print the offending file names and fail.
exec git diff-index --check --cached $against --

Tip1: best add the stop word to a line which will cause a compile failure if you would commit the lines around it but forgot the one with the stop word (cf. the if condition above).

Tip2: if you want to ignore this hook for one commit, use git commit -n -m "[tag] Your commit message".

Indicate the first run after new push from Android Studio

When developing an app with a big file size the time between pressing Ctrl+F5 and having the new app instance running on a connected device can be rather long.

A timespan of around 10 seconds for a 25MB app is long enough for me to deal with other things, e.g. staging my changes in the VCS and then looking back at the device wondering whether the new version is already running or if I’m looking at the old state. Usually I then start clicking to test the new implementation when the app just closes and reopens since the upload took longer than expected.

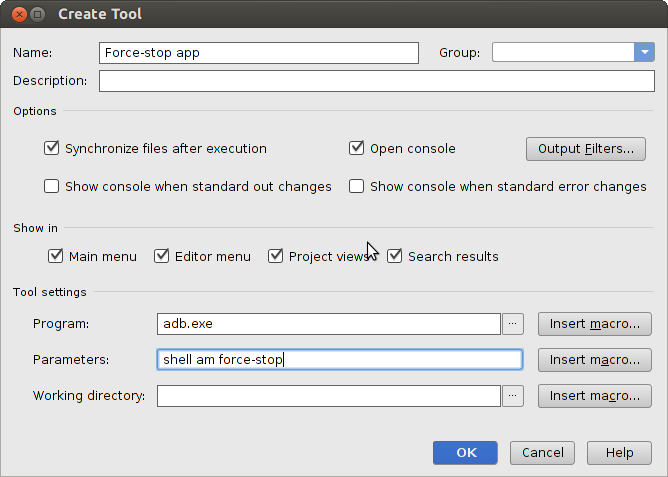
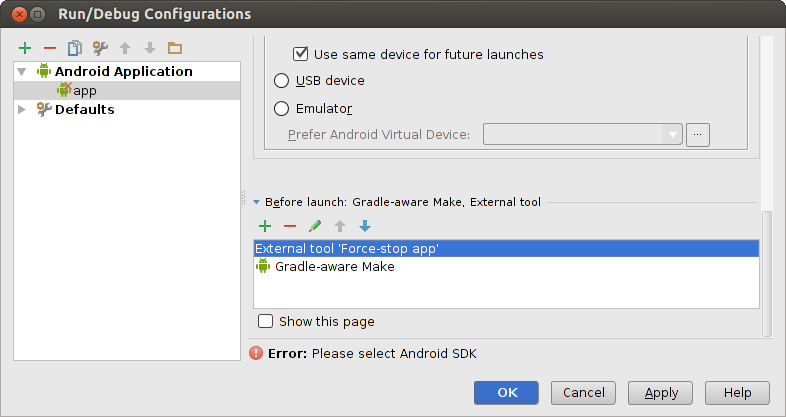
The solution is: Add a script to AndroidStudio’s build process which closes the app immediately after pressing Ctrl+F5. This way, when you see your app screen the next time, you can be sure that you are looking at the new version.

  1. Open Android Studio → Run → Edit Configurations
  2. Select your application, scroll to the bottom to the “Before launch” section. Click Plus -> Run External Tool -> Click Plus.Set the values:
    Name: Force-stop app
    program: adb.exe
    parameters: shell am force-stopcreateTool 
  3. Make sure that the external tool runs before the Gradle-aware Make in the “Before Launch” sectionrunDebugConfigurations

P.S.: An alternative would be to auto-increment the version code with every change but that is not feasible for me since I increment my version code automatically based on my git history (more on that later).

Surface Thumbnail

Microsoft Surface: remapping keys for power users

The Surface Pro 3 is a neat device but there are a bunch of user experience flaws concerning the Cover and the Pen (which we will solve in this post) such as:

  1. The Cover’s function keys F1-F12 can only be reached using the Fn button – especially annoying for developers.
  2. The Cover has no button for changing the screen brightness.
  3. The Surface Pen’s top button (the purple one) cannot be configured to open a custom program. I want the Snipping Tool to be opened.
  4. The Surface Pen lacks a “back” button, e.g. for quickly correct a wrong pen stroke in Photoshop, Mischief or similar drawing programs.
  5. I never use CapsLock – let’s map it to a different key, e.g. AltGr (this is of course not Surface-specific but a nice productivity boost nonetheless)

Solutions:

The solutions 1 & 2 are just simple keyboard shortcuts:

  1. Function key lock: Press Fn+CapsLock to toggle the behavior. Unfortunately, this introduces a new problem which will be solved in the paragraph after this:
    1. For F1-F8 I want the default to be the function keys themselves but for F9-F12 I want the reverse as default: Home, End, Page Up, Page DownSurface Pro cover: function keys
  2. Secret shortcuts for screen brightness: Fn + Del/Backspace

The remaining problems are solved by using AutoHotKey with its extensive scripting capabilities and a lively community sharing knowledge thereof.
After installing it, copy the following script to the autostart folder (e.g. under the name of EnableSurfaceProductivity.ahk) to have it running with every start. To test the effect immediately, double-click the file.

; Solution for 1b: Reverse behavior for F9-F12
; The dollar signs prevent that the hooks call themselves

$Home::SendInput, {F9}
return

$End::SendInput, {F10}
return

$PgUp::SendInput, {F11}
return

$PgDn::SendInput, {F12}
return

$F9::Send, {Home}
return

$F10::Send, {End}
return

$F11::Send, {PgUp}
return

$F12::Send, {PgDn}
return

; Solution 3: Open the Snipping Tool when double-pressing the purple button
; The script waits for the program to start and then simulates
; Win+PrintScreen which directly jumps to the selection process
#F19::
Run, "C:\Windows\Sysnative\SnippingTool.exe"
WinActivate, Snipping Tool ; This makes sure it is active
WinWaitActive, Snipping Tool
Send, ^{PrintScreen}
return

; Solution 4: Simulate Ctrl+Z when single-clicking the purple button
#F20::Send, ^z ; Left Arrow, Browser Back Button
return

; Solution 5: Map CapsLock to AltGr
CapsLock::RAlt
Logo of the git version control system

Git hook to prevent WIP commits to certain branches

Git hooks are a great way to automate your workflow and to check for faulty commits. I am using them to prevent work-in-progress commits to the master branch (i.e. commits with a line starting with the string WIP) . But wait – this script differs from the sample found in .git/hooks/pre-commit.sample in two ways:

  1. Only pushes to special heads are inspected. This still allows you to backup your WIP commit on the remote server or to share it with your colleagues but prevents integration into the master branch.
  2. Only commits which would actually be merged into the master are checked – and not all commits ever pushed. This way, even when a WIP commit was pushed to the master in the past, the script does not prevent you from pushing new commits. The pre-commit.sample would explicitly disallow that.

We have two staging areas in our development environment: All pushes to ready/<any name> or directPatch/<any name> trigger our continuous integration process and eventually merge the changes into our master (which you cannot push to directly). Pushes to <developer acronym>/<any name> are always allowed and do not trigger any merging. So we want to check only the pushes to ready and directPatch. Of course, you might want to adapt the script to your needs:

  1. Changing the heads to be checked – see line 24
  2. Changing the word to look for – see line 40

The following hook can be activated by storing it in the file <your repository>/.git/hooks/pre-commit (no file extension)

#!/bin/sh

# This hook is called with the following parameters:
#
# $1 -- Name of the remote to which the push is being done
# $2 -- URL to which the push is being done
#
# Information about the commits which are being pushed is
# supplied as lines to the standard input in the form:
#
#   <local ref> <local sha1> <remote ref> <remote sha1>
#
# This sample shows how to prevent push of commits where the
# log message starts with "WIP" (work in progress) and is pushed
# to a refs/heads/ready or refs/heads/directPatch

remote="$1"
url="$2"

z40=0000000000000000000000000000000000000000

IFS=' '
while read local_ref local_sha remote_ref remote_sha
do
	if [[ $remote_ref != refs/heads/ready/* ]] && [[ $remote_ref != refs/heads/directPatch/* ]]
	then
		# Do not check the WIP
		continue
	fi

	if [ "$local_sha" = $z40 ]
	then
		# Handle delete
		:
	else
		# Only inspect commits not yet merged into origin/master
		range="origin/master..$local_sha"

		# Check for WIP commit
		commit=`git rev-list -n 1 --grep '^WIP' "$range"`
		if [ -n "$commit" ]
		then
			echo "Found WIP commit in $local_ref: $commit, not pushing."
			exit 1
		fi
	fi
done

exit 0

Migrating Windows 7 to 8.1 without losing your apps

When trying to migrate from Windows 7 to 8.1 I learned that I would lose my installed applications. This was especially frustrating because I knew from the upgrade assistant that there is an option to keep them – it is just not available for my configuration. And even the official guide states that I would have to reinstall all apps.

The solution was: First migrate to Windows 8 (the option to keep your apps is available here) and then to 8.1 (which again allows you to keep your apps). My system is up and running and I did not have to reinstall anything. Voilà! The only question which remains is: why?

Migrating Eigen2 to Eigen3: useful regular expressions

I’ve recently migrated a project from Eigen2 library to Eigen3 based on the very useful staged migration path.

Here are two regular expressions which came in really handy. Of course you have to manually check the result but they save a lot of time.

/*
 * Using the new linear solver interface
 */

// Regular expression for finding
([^\S\n]*)([^\s]*)\.solve\(([\s]*)(.*?)([\s]*),([\s]*)\&(.*?)([\s]*)\)\;
// Regular expression for replacing
$1$7 = $2.solve\($4\);

Live-Preview

/*
 * Use the static way for map creation.
 * Does not work with all types
 */

// Regular expression for finding
Eigen::Map<(.*?)>\(
// Regular expression for replacing
$1::Map\(

Live-Preview

OpenCV: Draw epipolar lines

Drawing epipolar lines in OpenCV is not hard but it requires a sufficient amount of code. Here is a out-of-the-box function for your convenience which only needs the fundamental matrix and the matching points. And it even has an option to exclude outliers during drawing!

#include <opencv2/core/core.hpp>
#include <opencv2/highgui/highgui.hpp>
#include <opencv2/calib3d/calib3d.hpp>
#include <opencv2/imgproc/imgproc.hpp>
/**
 * \brief	Compute and draw the epipolar lines in two images
 *			associated to each other by a fundamental matrix
 *
 * \param title			Title of the window to display
 * \param F					Fundamental matrix
 * \param img1			First image
 * \param img2			Second image
 * \param points1		Set of points in the first image
 * \param points2		Set of points in the second image matching to the first set
 * \param inlierDistance			Points with a high distance to the epipolar lines are
 *								not displayed. If it is negative, all points are displayed
 **/
template <typename T1, typename T2>
static void drawEpipolarLines(const std::string& title, const cv::Matx<T1,3,3> F,
							  const cv::Mat& img1, const cv::Mat& img2,
							  const std::vector<cv::Point_<T2>> points1,
							  const std::vector<cv::Point_<T2>> points2,
							  const float inlierDistance = -1)
{
	CV_Assert(img1.size() == img2.size() && img1.type() == img2.type());
	cv::Mat outImg(img1.rows, img1.cols*2, CV_8UC3);
	cv::Rect rect1(0,0, img1.cols, img1.rows);
	cv::Rect rect2(img1.cols, 0, img1.cols, img1.rows);
	/*
	 * Allow color drawing
	 */
	if (img1.type() == CV_8U)
	{
		cv::cvtColor(img1, outImg(rect1), CV_GRAY2BGR);
		cv::cvtColor(img2, outImg(rect2), CV_GRAY2BGR);
	}
	else
	{
		img1.copyTo(outImg(rect1));
		img2.copyTo(outImg(rect2));
	}
	std::vector<cv::Vec<T2,3>> epilines1, epilines2;
	cv::computeCorrespondEpilines(points1, 1, F, epilines1); //Index starts with 1
	cv::computeCorrespondEpilines(points2, 2, F, epilines2);

	CV_Assert(points1.size() == points2.size() &&
			  points2.size() == epilines1.size() &&
			  epilines1.size() == epilines2.size());

	cv::RNG rng(0);
	for(size_t i=0; i<points1.size(); i++)
	{
		if(inlierDistance > 0)
		{
			if(distancePointLine(points1[i], epilines2[i]) > inlierDistance ||
				distancePointLine(points2[i], epilines1[i]) > inlierDistance)
			{
				//The point match is no inlier
				continue;
			}
		}
		/*
		 * Epipolar lines of the 1st point set are drawn in the 2nd image and vice-versa
		 */
		cv::Scalar color(rng(256),rng(256),rng(256));

		cv::line(outImg(rect2),
			cv::Point(0,-epilines1[i][2]/epilines1[i][1]),
			cv::Point(img1.cols,-(epilines1[i][2]+epilines1[i][0]*img1.cols)/epilines1[i][1]),
			color);
		cv::circle(outImg(rect1), points1[i], 3, color, -1, CV_AA);

		cv::line(outImg(rect1),
			cv::Point(0,-epilines2[i][2]/epilines2[i][1]),
			cv::Point(img2.cols,-(epilines2[i][2]+epilines2[i][0]*img2.cols)/epilines2[i][1]),
			color);
		cv::circle(outImg(rect2), points2[i], 3, color, -1, CV_AA);
	}
	cv::imshow(title, outImg);
	cv::waitKey(1);
}

template <typename T>
static float distancePointLine(const cv::Point_<T> point, const cv::Vec<T,3>& line)
{
	//Line is given as a*x + b*y + c = 0
	return std::fabsf(line(0)*point.x + line(1)*point.y + line(2))
			/ std::sqrt(line(0)*line(0)+line(1)*line(1));
}
The most important concepts of epipolar geometry. Author: Arne Nordmann, CC BY-SA 3.0