https://www.linkedin.com/posts/philipphasper_ai-ar-vuforia-activity-7319356213278724097-f1Xo
A deep-dive into the capturing of knowledge using Augmented Reality can be seen in this video:

https://www.linkedin.com/posts/philipphasper_ai-ar-vuforia-activity-7319356213278724097-f1Xo
A deep-dive into the capturing of knowledge using Augmented Reality can be seen in this video:


Or: How to install any app on the Quest 3 without giving Meta your phone number.
With the long anticipated Apple Vision Pro become available at February 2nd 2024 (unfortunately only in the US), we’ll finally see Apple’s take on a consumer-ready headset for mixed reality – er … I meant to say spatial computing. Seamless video see-through and hand tracking – what a technological marvel.
As of now, the closest alternative to the Vision Pro, those unwilling to spend $3500 or located outside the US, seems to be the Meta Quest 3. And this only at a fraction of the price, at $500. But unlike Apple, Meta is less known for privacy-aware products. After all, it is their core business model to not be.
This post explains how to increase your privacy on the Quest 3, in four easy steps.
Continue reading Privacy in the Metaverse
Wow, what a journey 🚀😎 . We are so proud to finally publicly share one of the things we have worked on since ioxp joined Vuforia: The new Vuforia Instruct feature Step Check™, starts its Public Beta now!
Based on the best-in-class Vuforia technology and developed together with many of the brightest people I know:
✴️Assisted quality assurance using #augmentedreality
✴️Integrated AI training
✴️Authoring from CAD
Next steps: learn from the beta feedback, improve and deliver!
Thank you, Vuforia, for how all of you welcomed us and for how we made things possible – together!
#ar #computervision #mixedreality #innovation #service #qualityassurance #acquisition
Update: Special video for the third Sunday of Advent 😉
This week Google released ARCore, their answer to Apple’s recently published Augmented Reality framework ARKit. This is an exciting opportunity for mobile developers to enter the world of Augmented Reality, Mixed Reality, Holographic Games, … whichever buzzword you prefer.
To get to know the AR framework I wanted to test how easy it would be to combine it with another awesome Android framework: Google VR, used for their Daydream and Cardboard platform. Specifically, its Spatial Audio API. And despite never having used one of those two libraries, combining them is astonishingly simple.
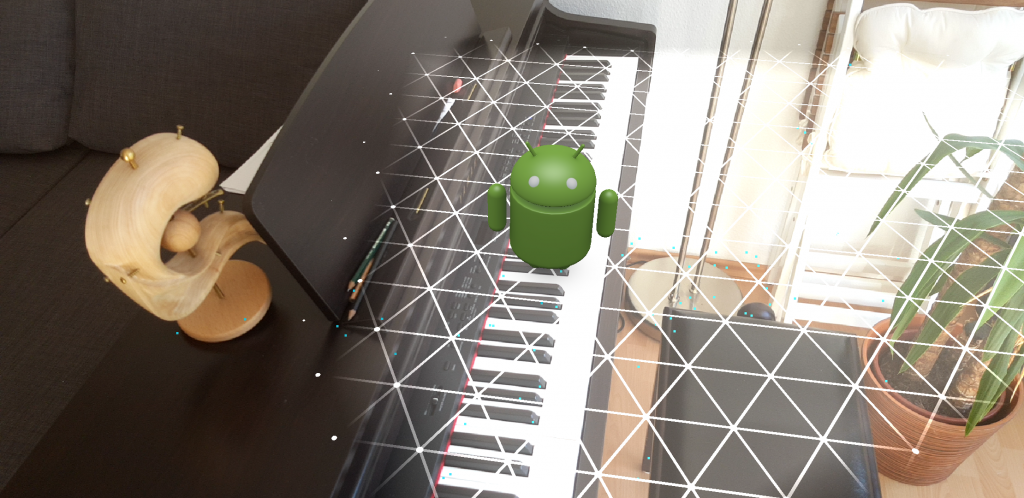
The goal is to add correctly rendered three dimensional sound to an augmented reality application. For a demonstrator, we pin an audio source to each of the little Androids placed in the scene.
Well, screenshots don’t make sense to demonstrate audio but without them this post looks so lifeless 🙂 Unfortunately, I could not manage to do a screen recording which includes the audio feed.
/samples/java_arcore_hello_ar it is based on the current Github repository’s HEAD/samples/java_arcore_hello_ar/app/build.gradle and add the VR library to the dependencies
dependencies {
    ...
    compile 'com.google.vr:sdk-audio:1.10.0'
}
I used “Sam’s Song” from the Ubuntu Touch Sound Package and you can download the correctly converted file here.
public class HelloArActivity extends AppCompatActivity implements GLSurfaceView.Renderer {
    /*
    ...
    */
    private GvrAudioEngine mGvrAudioEngine;
    private ArrayList<Integer> mSounds = new ArrayList<>();
    final String SOUND_FILE = "sams_song.wav";

    @Override
    protected void onCreate(Bundle savedInstanceState) {
        /*
        ...
         */
        mGvrAudioEngine = new GvrAudioEngine(this, GvrAudioEngine.RenderingMode.BINAURAL_HIGH_QUALITY);
        new Thread(
            new Runnable() {
                @Override
                public void run() {
                    // Prepare the audio file and set the room configuration to an office-like setting
                    // Cf. https://developers.google.com/vr/android/reference/com/google/vr/sdk/audio/GvrAudioEngine
                    mGvrAudioEngine.preloadSoundFile(SOUND_FILE);
                    mGvrAudioEngine.setRoomProperties(15, 15, 15, PLASTER_SMOOTH, PLASTER_SMOOTH, CURTAIN_HEAVY);
                }
            })
        .start();
    }

    @Override
    protected void onResume() {
        /*
        ...
         */
        mGvrAudioEngine.resume();
    }

    @Override
    public void onPause() {
        /*
        ...
         */
        mGvrAudioEngine.pause();
    }

    @Override
    public void onDrawFrame(GL10 gl) {
        // Clear screen to notify driver it should not load any pixels from previous frame.
        GLES20.glClear(GLES20.GL_COLOR_BUFFER_BIT | GLES20.GL_DEPTH_BUFFER_BIT);

        try {
            // Obtain the current frame from ARSession. When the configuration is set to
            // UpdateMode.BLOCKING (it is by default), this will throttle the rendering to the
            // camera framerate.
            Frame frame = mSession.update();

            // Handle taps. Handling only one tap per frame, as taps are usually low frequency
            // compared to frame rate.
            MotionEvent tap = mQueuedSingleTaps.poll();
            if (tap != null && frame.getTrackingState() == TrackingState.TRACKING) {
                for (HitResult hit : frame.hitTest(tap)) {
                    // Check if any plane was hit, and if it was hit inside the plane polygon.
                    if (hit instanceof PlaneHitResult && ((PlaneHitResult) hit).isHitInPolygon()) {
                        /*
                        ...
                         */
                        int soundId = mGvrAudioEngine.createSoundObject(SOUND_FILE);
                        float[] translation = new float[3];
                        hit.getHitPose().getTranslation(translation, 0);
                        mGvrAudioEngine.setSoundObjectPosition(soundId, translation[0], translation[1], translation[2]);
                        mGvrAudioEngine.playSound(soundId, true /* looped playback */);
                        // Set a logarithmic rolloffm model and mute after four meters to limit audio chaos
                        mGvrAudioEngine.setSoundObjectDistanceRolloffModel(soundId, GvrAudioEngine.DistanceRolloffModel.LOGARITHMIC, 0, 4);
                        mSounds.add(soundId);

                        // Hits are sorted by depth. Consider only closest hit on a plane.
                        break;
                    }
                }
            }
            /*
             ...
             */
            // Visualize planes.
            mPlaneRenderer.drawPlanes(mSession.getAllPlanes(), frame.getPose(), projmtx);

            // Visualize anchors created by touch.
            float scaleFactor = 1.0f;
            for (int i=0; i < mTouches.size(); i++) {
                PlaneAttachment planeAttachment = mTouches.get(i);
                if (!planeAttachment.isTracking()) {
                    continue;
                }
                // Get the current combined pose of an Anchor and Plane in world space. The Anchor
                // and Plane poses are updated during calls to session.update() as ARCore refines
                // its estimate of the world.
                planeAttachment.getPose().toMatrix(mAnchorMatrix, 0);

                // Update and draw the model and its shadow.
                mVirtualObject.updateModelMatrix(mAnchorMatrix, scaleFactor);
                mVirtualObjectShadow.updateModelMatrix(mAnchorMatrix, scaleFactor);
                mVirtualObject.draw(viewmtx, projmtx, lightIntensity);
                mVirtualObjectShadow.draw(viewmtx, projmtx, lightIntensity);

                // Update the audio source position since the anchor might have been refined
                float[] translation = new float[3];
                planeAttachment.getPose().getTranslation(translation, 0);
                mGvrAudioEngine.setSoundObjectPosition(mSounds.get(i), translation[0], translation[1], translation[2]);
            }

            /*
             * Update the listener's position in the audio world
             */
            // Extract positional data
            float[] translation = new float[3];
            frame.getPose().getTranslation(translation, 0);
            float[] rotation = new float[4];
            frame.getPose().getRotationQuaternion(rotation, 0);

            // Update audio engine
            mGvrAudioEngine.setHeadPosition(translation[0], translation[1], translation[2]);
            mGvrAudioEngine.setHeadRotation(rotation[0], rotation[1], rotation[2], rotation[3]);
            mGvrAudioEngine.update();
        } catch (Throwable t) {
            // Avoid crashing the application due to unhandled exceptions.
            Log.e(TAG, "Exception on the OpenGL thread", t);
        }
    }
    /*
     ...
     */
}
android:screenOrientation="landscape"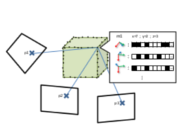
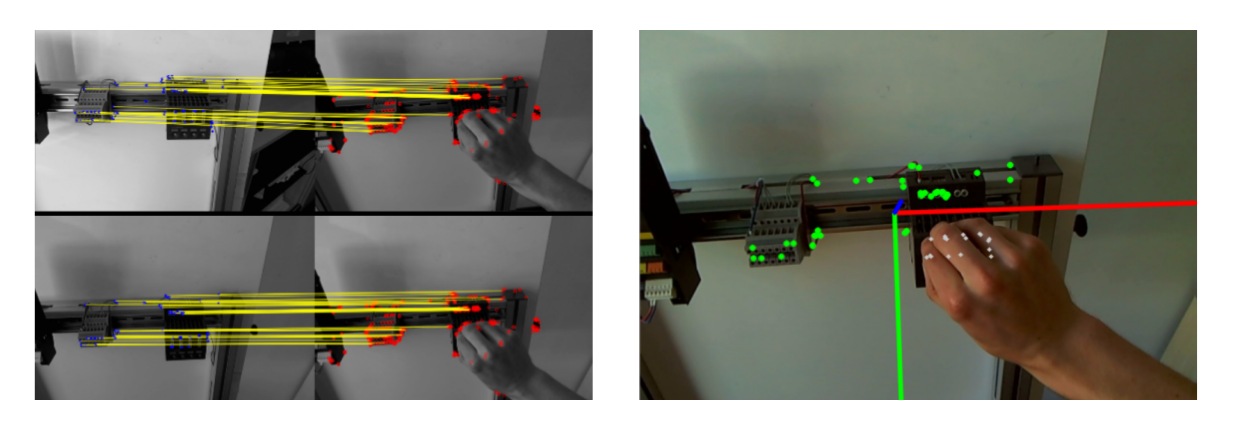
The final piece of my Master in Computer Science is the thesis “Monocular SLAM for Context-Aware Workflow Assistance”. The abstract is included below:
In this thesis, we propose the integration of contextual workflow knowledge into a
SLAM tracking system for the purpose of procedural assistance using Augmented Reality.
Augmented Reality is an intuitive way for presenting workflow knowledge (e.g. main-
tenance or repairing) step by step but requires sophisticated models of the scene appear-
ance, the actions to perform and the spatial structure. For the latter one we propose the
integration with SLAM (Simultaneous Localization And Mapping) operating on images of
a monocular camera.
We first develop a stand-alone SLAM system with a point cloud as map representation
which is continuously extended and refined by triangulations obtained from new view
points using a three-step keyframe insertion procedure. In a second step, we integrate
contextual knowledge which is automatically obtained from reference recordings in a so-
called offline mapping step. This allows the tracking not only to cope with but actively
adapt to changes in the environment by explicitly including them in the tracking model.
To aid the data acquisition and to merge multiple tracking models into a single one, we
propose a novel method for combining offline acquired maps which is independent of the
spatial structure as opposed to ICP (Iterative Closest Point).
We show typical tracking results and evaluate the single components of our system by
measuring their performance when exposed to noise.
I wrote my thesis in Prof. Stricker’s Augmented Vision group and was supervised by Nils Petersen.
@mastersthesis{Hasper2014,
author = {Hasper, Philipp},
school = {TU Kaiserslautern},
title = {{Monocular SLAM for Context-Aware Workflow Assistance}},
type = {Masterthesis},
year = {2014}
}
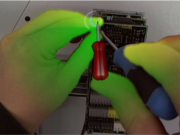
As last year, I will be an exhibitor at this year’s CeBIT taking place March 10-14 in Hannover. We will present the awesome AR-Handbook at Hall 9, Booth D44.
Our topic is Fast MRO (Fast Maintenance, Repair and Overhaul) – a comprehensive Augmented Reality Maintenance Information System that shows and explains technical details for simplified maintenance work right where it is needed. Using a John Deere tractor as an example, Fast MRO offers support for the exchange of defective consumables or the maintenance of lubrication parts. The system offers information about the position of machine elements, maintenance intervals or the use of certain components and guides the repairman step by step through the individual work instructions.

As part of my work at the DFKI Kaiserslautern, I published a paper at VISAPP 2014 dealing with Remote Execution for mobile Augmented Reality:
Remote Execution vs. Simplification for Mobile Real-time Computer Vision. Philipp Hasper, Nils Petersen, Didier Stricker. In Proceedings of the 9th International Conference on Computer Vision Theory and Applications (VISAPP) 2014. doi:10.5220/0004683801560161.
Mobile implementations of computationally complex algorithms are often prohibitive due to performance constraints. There are two possible solutions for this: (1) adopting a faster but less powerful approach which results in a loss of accuracy or robustness. (2) using remote data processing which suffers from limited bandwidth and communication latencies and is difficult to implement in real-time interactive applications. Using the example of a mobile Augmented Reality application, we investigate those two approaches and compare them in terms of performance. We examine different workload balances ranging from extensive remote execution to pure onboard processing.
@inproceedings{Hasper2014,
author = {Hasper, Philipp and Petersen, Nils and Stricker, Didier},
booktitle = {Proceedings of the 9th International Conference on Computer Vision Theory and Applications},
doi = {10.5220/0004683801560161},
isbn = {978-989-758-003-1},
pages = {156--161},
publisher = {SCITEPRESS - Science and and Technology Publications},
title = {{Remote Execution vs. Simplification for Mobile Real-time Computer Vision}},
year = {2014}
}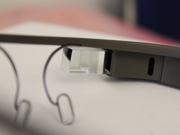
Since Google Glass is currently only available for “Explorers”, the usability is quite limited and the device requires some hacking. Since the Glass-specific OS is updated regularly this will change soon but up until then, the following trick will come in handy:
Install and run an APK on Google Glass:
Well, currently the standard Glass launcher is quite limited and only allows for starting some pre-installed applications. You could either install a custom launcher like Launchy or do it without any modifications at all: In a nutshell, we will install the APK, find out the name of the app’s launching activity and then launch it. So no modifications and no prior knowledge of the application’s code is needed.
adb install <apk path>.<sdk>\build-tools\<version>).aapt dump badging <apk path> | grep launchable-activity.adb shell am start -a android.intent.action.MAIN -n <package name>/<activity name>.adb shell am start -a android.intent.action.MAIN -n com.passdraw.free/com.passdraw.free.activities.LandingActivity I recently got my hands on a Google Glass, the Android-based head-mounted display developed by Google. While connecting to it and installing apps works like a charm on my Linux system, it was quite a hassle to do the same with Windows.
I found a quite nice tutorial which I had to adapt to Windows 8: In a nutshell, we have to convince the Google usb driver that it fits to the Glass device and due to the editing we have to convince Windows 8, that it is okay for the driver’s signature to mismatch. Please proceed at your own responsibility.
<sdk>\extras\google\usb_driver\android_winusb.inf[Google.NTx86] and [Google.NTamd64]:
;Google Glass
%SingleAdbInterface% = USB_Install, USB\VID_0000&PID_0000&REV_0216
%CompositeAdbInterface% = USB_Install, USB\VID_0000&PID_0000&MI_01

%SingleAdbInterface% = USB_Install, USB\VID_0000&PID_0000&REV_0216
%CompositeAdbInterface% = USB_Install, USB\VID_0000&PID_0000&MI_01
android_winusb.inf and search for the lines
CatalogFile.NTx86   = androidwinusb86.cat
CatalogFile.NTamd64 = androidwinusba64.cat
and comment them out:
;CatalogFile.NTx86   = androidwinusb86.cat
;CatalogFile.NTamd64 = androidwinusba64.cat
