OpenCV and Visual Studio: Empty Call Stack

For a couple of years I have used OpenCV for Android and developed with Eclipse. But a while back I started a bigger project which will run on stationary machines so I began to learn how to use Visual Studio 2013. The integration of OpenCV 2.4.8 was fairly easy and I was quickly able to run my code.

(Just as a service since the library names on the given site are outdated – here are all the names for easy copying:)

opencv_calib3d248.lib
opencv_contrib248.lib
opencv_core248.lib
opencv_features2d248.lib
opencv_flann248.lib
opencv_gpu248.lib
opencv_highgui248.lib
opencv_imgproc248.lib
opencv_legacy248.lib
opencv_ml248.lib
opencv_nonfree248.lib
opencv_objdetect248.lib
opencv_ocl248.lib
opencv_photo248.lib
opencv_stitching248.lib
opencv_superres248.lib
opencv_ts248.lib
opencv_video248.lib
opencv_videostab248.lib
opencv_calib3d248d.lib
opencv_contrib248d.lib
opencv_core248d.lib
opencv_features2d248d.lib
opencv_flann248d.lib
opencv_gpu248d.lib
opencv_highgui248d.lib
opencv_imgproc248d.lib
opencv_legacy248d.lib
opencv_ml248d.lib
opencv_nonfree248d.lib
opencv_objdetect248d.lib
opencv_ocl248d.lib
opencv_photo248d.lib
opencv_stitching248d.lib
opencv_superres248d.lib
opencv_ts248d.lib
opencv_video248d.lib
opencv_videostab248d.lib

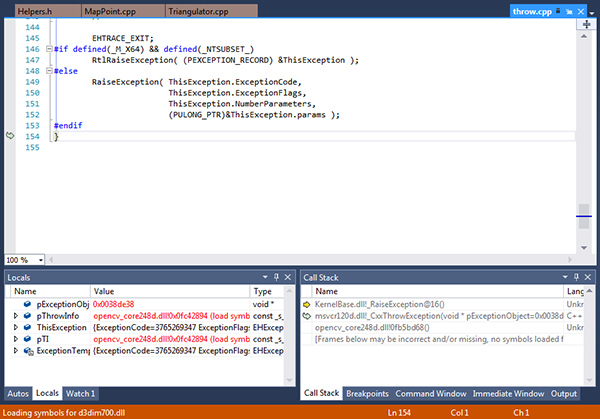
But then I experienced a strange behaviour: Every time an exception or assertion was thrown inside of an OpenCV method, I would have no clue what happened since the call stack had only four entries: Something about KernelBase.dll, msvcr120d.dll, opencv_core248.dll and the last one “Frames below may be incorrect and/or missing, no symbols loaded for opencv_core248d.dll“.

Frames below may be incorrect and/or missing, no symbols loaded for opencv_core248d.dll

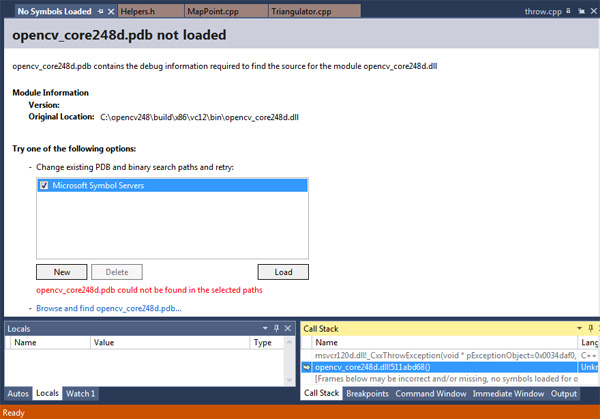
Upon further examination (clicking on the opencv_core248d.dll entry) Visual Studio revealed that the .pdb file was missing: it said “opencv_core248d.pdb not loaded” and “opencv_core248d.pdb could not be found in the selected paths“.

opencv_core248d.pdb not loaded. opencv_core248d.pdb could not be found in the selected paths

I quickly found some .pdb files in C:\opencv248\build\x86\vc12\staticlib but since they did not match the .dlls, they did not work either. So what to do? Essentially we have to build OpenCV ourselves but we will leave out any 3rd party libraries since we only want to debug, not to have fast code (of course you can build a complete version but I didn’t do it in order to save time). In the following I will describe only the basic steps, for a full documentation including pictures and how to add performance-improving 3rd party libraries visit the original tutorial.

  1. I assume you have an OpenCV copy, e.g. under C:\opencv248\ . The folder contains a build and a sources folder.
  2. Install CMake
  3. Start CMake (cmake-gui). It should be in your start menu. Enter C:\opencv248\sources in the first field (“Where is the source code:”) and a freely chosen path e.g. C:\opencv248\ownBuild\ in the second one.
  4. Press “Configure” and select your compiler – for Visual Studio 2013 32-bit it would be “Visual Studio 12”. I then ignored a warning about Java AWT and python missing and pressed the “Generate” button.
  5. Wait for the process to finish, then open C:\opencv248\ownBuild\OpenCV.sln. Build both Debug and Release configuration which should take some time.
  6. After the build, go into C:\opencv248\ownBuild\bin. There are two folders containing all files you will need. Now you have two options:
    1. Remove any directory previously leading to the OpenCV dlls from your PATH (e.g. in my case I removed C:\opencv248\build\x86\vc12\bin ) and then add C:\opencv248\ownBuild\bin\Debug and C:\opencv248\ownBuild\bin\Release to your PATH.
    2. Remove any directory previously leading to the OpenCV dlls from your PATH. Then move all .dll and .pdb files from the Debug and Release folder to a “save” place, e.g. C:\opencv248\debuggableDLL. Add this folder to your PATH, then delete the whole C:\opencv248\ownBuild\ folder to free disk space.
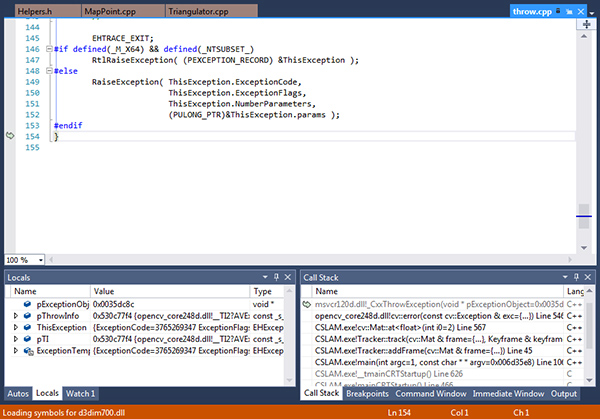
  7. Restart Visual Studio and start a debug session. Now the call stack shows exactly what happened: The call stack now shows the correct lines
  8. Remember to switch back to the optimized dlls when doing performance testing!

If you don’t want to build this all by yourself, here is the result of the build process for Visual Studio 2013 32-bit (the original size of >800MB is compressed to 80MB). To download the archive, activate JavaScript, enter “vsopencv” in the following field and then click the download button. Uncompress the archive with 7-zip and then perform step 6.b.

OpenCV: Reading an image sequence backwards

Here is a small code snippet for OpenCV which reads an image sequence backwards. It needs a sequence of images 000.png, 001.png, 002.png, … in the project’s folder.

cv::Mat frame;
cv::VideoCapture capture("000.png");
capture.set(CV_CAP_PROP_POS_AVI_RATIO, 1);
while (true)
{
	capture >> frame;
	capture.set(CV_CAP_PROP_POS_FRAMES, capture.get(CV_CAP_PROP_POS_FRAMES) - 2);

	cv::imshow("image", frame);
	cv::waitKey(30);
}

So what does the code do?

  1. Setting the property CV_CAP_PROP_POS_AVI_RATIO to 1 means starting at the end of the sequence (0 = at the beginning).
  2. The property CV_CAP_PROP_POS_FRAMES defines the index of the next image to load. Since it is automatically increased after each image retrieval, we have to decrement it by the value of 2.

Start AfterEffects in a different language

If you want to start AfterEffects CS4 in a different language than you have it installed (i.e. if you want to follow an English tutorial and cannot find the effects), open the program with the additional command  -L en_US .

Just create a link on your desktop and add this command after the target: "C:\...\AfterFX.exe" -L en_US.

You can find all available language codes by looking into the installation directory of AfterEffects and opening the AMT folder.

xkcd widget

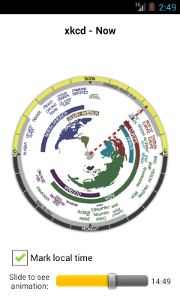
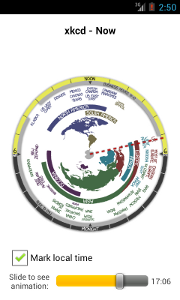
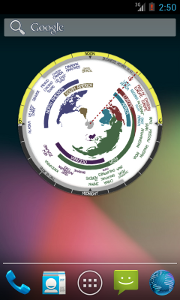
When I saw the xkcd comic “Now”, I immediately wanted it as widget on my smartphone. A cool little gadget showing you the approximate time of day all around the world.

I searched trough the Google Play Store and only found versions with a huge file size – since they just stored all possible images in the app files, the widgets reached a size of around 25 MB.

So I spent a few hours learning how to built Android widgets and compiled my own version – fewer than 1 MB big and with a cool preview animation.

Download the xkcd widget and try it for yourself!

XKCD Screenshot 3 XKCD Screenshot 4XKCD Screenshot 2

See you at the CeBIT 2014

As last year, I will be an exhibitor at this year’s CeBIT taking place March 10-14 in Hannover. We will present the awesome AR-Handbook at Hall 9, Booth D44.

Our topic is Fast MRO (Fast Maintenance, Repair and Overhaul) – a comprehensive Augmented Reality Maintenance Information System that shows and explains technical details for simplified maintenance work right where it is needed. Using a John Deere tractor as an example, Fast MRO offers support for the exchange of defective consumables or the maintenance of lubrication parts. The system offers information about the position of machine elements, maintenance intervals or the use of certain components and guides the repairman step by step through the individual work instructions.

Remote Execution vs. Simplification for Mobile Real-time Computer Vision

As part of my work at the DFKI Kaiserslautern, I published a paper at VISAPP 2014 dealing with Remote Execution for mobile Augmented Reality:

Remote Execution vs. Simplification for Mobile Real-time Computer Vision. Philipp Hasper, Nils Petersen, Didier Stricker. In Proceedings of the 9th International Conference on Computer Vision Theory and Applications (VISAPP) 2014. doi:10.5220/0004683801560161.

Mobile implementations of computationally complex algorithms are often prohibitive due to performance constraints. There are two possible solutions for this: (1) adopting a faster but less powerful approach which results in a loss of accuracy or robustness. (2) using remote data processing which suffers from limited bandwidth and communication latencies and is difficult to implement in real-time interactive applications. Using the example of a mobile Augmented Reality application, we investigate those two approaches and compare them in terms of performance. We examine different workload balances ranging from extensive remote execution to pure onboard processing.

@inproceedings{Hasper2014,
author = {Hasper, Philipp and Petersen, Nils and Stricker, Didier},
booktitle = {Proceedings of the 9th International Conference on Computer Vision Theory and Applications},
doi = {10.5220/0004683801560161},
isbn = {978-989-758-003-1},
pages = {156--161},
publisher = {SCITEPRESS - Science and and Technology Publications},
title = {{Remote Execution vs. Simplification for Mobile Real-time Computer Vision}},
year = {2014}
}

Indoor pedestrian navigation based on recursive filtering (Seminar Paper)

I decided to share my seminar with you which I did back in the summer semester 2013. It is a survey paper about indoor pedestrian navigation. The paper is a good starting point to introduce you to the topic and provides you with interesting literature.

While localization is most commonly associated with GPS, many use cases remain where satellite-based navigation is too inaccurate or fails completely. In this seminar, we will present techniques usable for indoor localization of pedestrians. We will introduce several approaches using Inertial Measurement Units attached to the subject. Due to the strong drifting behavior of those units, several steps are necessary to provide feasible accuracy: the use of filter techniques and the use of Zero Velocity Updates. We will explain the required state-space
model and its application in recursive Bayesian filters like the Extended Kalman Filter or the Particle Filter. The use of aiding techniques is discussed and a map-aided, WiFi-initialized Particle Filter is presented.

Kalman Filter
Figure from the seminar paper showing the steps of the Extended Kalman Filter (EKF).
@MISC{Hasper2013,
author = {Hasper, Philipp and Bleser, Gabriele},
title = {Indoor pedestrian navigation based on recursive filtering},
howpublished = {Seminar Paper},
year = {2013},
keywords = {Sensor fusion, Recursive Filtering, Kalman Filter, Particle Filter,
ZUPT, EKF, MCL}
}

Repair a destroyed Windows 7 UEFI boot sector

I recently destroyed my Windows 7 UEFI boot sector by overwriting the corresponding EFI partition. This resulted in an error “Reboot and select proper boot device or insert boot media in selected”. This is how I fixed it (please be careful when dealing with partitioning and boot sectors, backup your data beforehand):

  1. Delete what is remaining of the Windows boot partition (not the Windows partition but the partition of around 128 MB size) and the EFI partition – you can use GParted for this. In the end, you should have at least 229 MB of free space on your hard drive – preferably at the beginning.
  2. Reboot from your Windows 7 DVD. Make sure you boot the UEFI part of the disk: When you open your boot menu by pressing F8, you will see two entries for your Windows 7 disk. One with “UEFI:” in front and one without. Select the former and then don’t forget to press any key if you are asked to – otherwise, the non-UEFI part would be booted.
  3. When Windows starts from the DVD, select the desired language and then press Shift+F10 to open the terminal.
  4. Now we will create the two missing partitions: the EFI boot sector and the Windows Boot sector. Type into the terminal (but leave the #… parts out – they are only comments by me):
    diskpart
    list disk
    select disk 0 #Select the desired disk
    create partition efi size=100
    list partition #Make sure that the 100mb partition is selected
    format quick fs=fat32 label="System"
    assign letter=B
    create partition msr size=128
    list partition #Check for errors
    list vol
    select vol 3 #Use the number corresponding to your windows installation
    assign letter=C
    exit
  5. Now copy the EFI files by typing:
    mkdir B:\EFI\Microsoft\Boot
    xcopy /s C:\Windows\Boot\EFI\*.* B:\EFI\Microsoft\Boot
  6. Now we will set the boot configuration data by typing:
    b:
    cd EFI\Microsoft\Boot
    bcdedit /createstore BCD
    bcdedit /store BCD  /create {bootmgr} /d “Windows Boot Manager”
    bcdedit /store BCD /create /d “Windows 7” /application osloader
    #This will return a GUID, referred to later as {guid}
    bcdedit /store BCD /set {bootmgr} default {guid}
    bcdedit /store BCD /set {bootmgr} path \EFI\Microsoft\Boot\bootmgfw.efi
    bcdedit /store BCD /set {bootmgr} displayorder {default}
    #Now it's not {bootmgr} anymore but {default}!
    bcdedit /store BCD /set {default} device partition=c:
    bcdedit /store BCD /set {default} osdevice partition=c:
    bcdedit /store BCD /set {default} path \Windows\System32\winload.efi
    bcdedit /store BCD /set {default} systemroot \Windows
    exit
  7. Restart. Additionally, I had two partitions with the boot flag which also caused trouble. I changed this with GParted.
  8. [Update] Configure the boot priority the UEFI menu so that the boot partition is the topmost.
  9. [Update] If you still have the problem that Windows is not booting automatically (i.e. the message “Reboot and select proper boot device or insert boot media in selected” is still displayed) but everything works fine when you open the boot menu and select the Windows bootloader yourself, this is the solution which worked for me:
    1. Power off the computer
    2. Unplug your hard drive
    3. Restart the computer, watch the booting fail and then power off again
    4. Replug your hard drive, restart and watch the booting succeed!


After Effects: Split-flap text animation

Here is a code snippet which allows you to animate text changes similar to a split-flap display using AfterEffects. The animation does not look exactly like those displays because I wanted a slightly different behavior for texts of different lengths. This is how the effect will look like (click on the following image to start the animation):
splitFlapDisplay

So how to do this in AfterEffects?

  1. Create a new text layer and add a slider control to the layer by searching for it in the Effects&Presets field.
  2. Now we have to enter an expression for the source text: open the layer properties and then the text property. Alt-click on the stop watch next to “Source Text”. Now, it should look like this:Split-Flap Display Tutorial 02
  3. Then enter the following code into the expression field (the field on the right which currently says “text.sourceText”):
    var oldText = "the old text";
    var newText = "new content";
    
    
    var result = "";
    var percentage = Math.min(Math.max(0,<code>effect("Slider Control")("Slider"</code>),100);
    //Iterate through charcodes
    var maxLength = Math.max(oldText.length, newText.length);
    for(var i=0; i<maxLength; i++) {
    	if(i> oldText.length-1) {
    		//The old text is shorter
    		var toomuch= maxLength-oldText.length;
    		var additional = percentage/100*toomuch;
    		if(i < oldText.length+ additional) {
    			result += String.fromCharCode(newText.charCodeAt(i));
    		}
    	} else if( i > newText.length-1) {
    		//The new text is shorter
    		var toomuch= maxLength-newText.length;
    		var additional = (100-percentage)/100*toomuch;
    		if(i < newText.length+ additional) {
    			result += String.fromCharCode(oldText.charCodeAt(i));
    		}
    	} else {
    		result += String.fromCharCode(oldText.charCodeAt(i) + percentage/100*(newText.charCodeAt(i)-oldText.charCodeAt(i)));
    	}
    }
    result
    
  4. Note: if you have started AfterEffects in a different language than English you will get an exception. This is because effect("Slider Control")("Slider") in line 5 cannot be found. Find the slider control in the text layer, write down the right names and enter them into line 5 (i.e. in German: effect("Einstellungen für Schieberegler")("Schieberegler") ).
  5. Change the variables oldText and newText to your desired values.
  6. Now you can animate the slider with values between 0 (old text) and 100 (new text).

You can also download an example project:

Protect your email address from crawlers

I have come up with my own way to protect private data like email addresses, postal addresses or telephone numbers you want to or have to publish on your website. I was wondering if anybody else does it this way and what could be possible pitfalls. So please comment this post or write me if you have any remarks.

A simple solution would be hiding it via JavaScript (technically this would rather be “revealing via JS”) – but this does not work for me since I don’t want to exclude users with disabled JavaScript, for example blind people using screen reader. Plus, German law requires you to provide contact information barrier-free. The same holds for displaying the address as image.

My approach works with simple HTML+CSS only:

  1. One long-known technique for “encryption” of email addresses which I included into my approach is the substitution of some characters in your HTML code by their hexadecimal counterpart, i.e. mail@example.com → mail@example.com. This will break poorly-programmed crawlers but it is a pretty old trick so I assume it is not that effective anymore.
  2. Another simple method are HTML comments which won’t affect your readers but (hopefully) some crawlers: mail@example.com → ma<!-- just one comment -->il@example.com.
  3. And here comes the new part: include invisible boxes containing useless text in your code: mail@example.com → mail@ex<span style="visibility:hidden;float:right;">useless</span>ample.com.
  4. Please don’t forget to exclude sites with such disguised information from legitimate web crawlers via your robots.txt file – otherwise your site would look broken.

Altogether this disguises your email address as

ma&#105;&#108;&#64;<span style="visibility:hidden; float:right;"> useless </span>examp&#108;<!-- just one comment -->&#101;.com.

As you may notice this approach is not very pleasant for screen reader users either but I think if you include a personal message via

<div style="visibility:hidden; float:right; height:0px;">
Dear screen reader user. I have included some invisible boxes
in the following contact information to puzzle spam crawlers.
I apologize for your extra work but I am sure you will
be able to decode the text.
</div>

it will work for them. Displaying your address as image or disguising via JavaScript would not.