
At ioxp we develop a novel way of sharing knowledge using Augmented Reality, AI and Computer Vision to change the way how industries operate. Our ecosystem consists of many different tools and technologies – the AI backend, Hololens apps , Android apps, a web-based editor and cloud services – so we are very dependent on an efficient way to organize our developers and their different, often overlapping sub-teams.
And after all we are a startup and engineers by heart – we have to keep the balance between a thorough designed process and the creative freedom needed to explore and create new things.
This post will concentrate on how we facilitate developer communication and team work using features of the DevOps tool Gitlab, factoring out all other important stages like product management, planning or sprint planning. It is an excerpt from our internal Handbook (naturally hosted as Wiki in Gitlab) and describes the process I have designed and implemented together with my team.
The development process is primarily guided by issues and their three most important attributes: labels, assignees and related merge requests. It uses as little as 10 different issue labels and is divided into six stages:

1. Reporting
To start the development process, an issue has to be created and the suitable labels and meta data have to be added.
In the old days we had the guideline for developer bug reports “if reporting takes longer than implementing/fixing, don’t report but implement directly”. This is only partly true by now: To aid the testing, documentation and change log generation, you should almost always create an issue. Even if you only do it after the implementation – in this case, you can keep the issue very brief, but should label it correctly and close it directly. This maintains an overview about what happened in the code base and will aid changelog generation
General rules for reporting
- Always check if the issue already exists by searching in the open and closed issues. Try some synonyms as well.
- If your first chosen keywords did not turn up an issue you later did find, please add the keywords to the issue as explained in section 1.3.
- If you have to reopen an already closed issue because of a regression, consider if you should add the label priority:high. This might be reasonable if you assume the regression might have a larger radius than only the observed issue itself.
1.1 Feature Requests
The labelsWhile there is no sharp distinction between features and user stories, a user story is typically a “very large” feature or a compilation of multiple sub-features, so the label is used far less than the feature label. A userstory is formulated goal-driven and often spans several technical modules:
- “User wants to document a new workflow with the smartphone and then add some technical documents for further explanation”
- “User wants to provide a download link and view the content on a Hololens to share AR content with colleagues”
- “User wants to replace a couple of existing steps with new, updated material as they found a better workflow”
If an already implemented (and thus closed) user story is to be amended, the issue is reopened and reformulated to add new details and/or user goals.
1.2 Bug reports
The labels- Bug (showstopper)requires immediate attention (similar topriority:high) and this label should only be used if absolutely necessary to prevent clutter and keep the overview of severe issues. Before using it, think twice if it could be labeled asBuginstead. A showstopper means that there is no workaround available, the workaround is far too complex, there are data losses or the broken module is such a common one that using a workaround is not acceptable. If you attribute this label to an issue you always have to explain in the issue text or discussion, why.
- BugSevere impact on the usability of the software, commonly used functionality is behaving in unintended way.
- Bug (minor)Not commonly used functionality is broken. Minor flaws
1.3 Meta Data
- The issue title should be a short summary and not contain reasons, justifications or explanations. Use the issue description for this.
- When reporting, always think about searchability of the issue. Would you find it again by using the search box? Would somebody else? You can add additional keywords to the end of the issue description with a markdown line looking like this:
**Keywords:** Color picker, customization. - When reporting, keep in mind that the testing team will also use the issue as reference. So maybe add some aspects important for testing
- Label priority:high: A showstopper issue is implicitly of high priority. Use the priority label to attribute a sense of urgency to other issues as well. This label is used for a) features needed urgently b) minor/standard bugs which massively benefit from being fixed imediately and c) issues which block other developers
- Label Verify: An issue might be hard to reproduce and should be investigated further. You can add an assignee to determine who should do this – often this will be someone from the testing team. After investigation, the assigned person describes the observed behavior and will either unassign themselves and remove the label or will close the issue, if nothing remarkable could be observed.
- Label Testing: Marks this issue for testing after it is closed (see section 4.)
1.4 Assignee
The assignee of an issue is its owner and responsible for its current state. In the reporting stage there should mostly be nobody assigned (aside of “Verify” issues). In most cases, the assignee of an issue should be determined by the development team, not the reporter because assigning someone “hides” the issue from other developers which won’t feel responsible for it anymore and will have the impression that this issue has been taken care of. So a reporter should assign a developer only
- if they will actually work on the issue in the near future
- or if it is clear that nobody else can ever take care of it
Additionally, for the individual developer their assigned issues are something like a TODO list which is more effective the more immediate it is:

1.5 Meta issues / Issue collections
Especially for brand new feature previews, creating dozens of new issues in a couple of minutes will pollute the issue tracker. In such cases, please create a meta issue (title prefixed with “[meta]”) to collect the open points.
- Please number them to make the discussion easier (“regarding aspect 14. we have to …”). If needed, start one new discussion per number for better reading.
- Use checkboxes for easier tracking of what is already resolved
- More complex defects should be written as a separate issue but linked in the list.
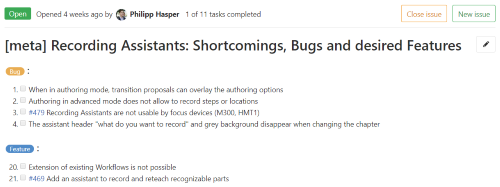
One example in Markdown and how it later looks like:
[meta] Recording Assistants: Shortcomings, Bugs and desired Features
### ~Bug :
1. [ ] When in authoring mode, transition proposals can overlay the authoring options
1. [ ] Authoring in advanced mode does not allow to record steps or locations
1. [ ] #479 Recording Assistants are not usable by focus devices (M300, HMT1)
1. [ ] The assistant header "what do you want to record" and grey background disappear when changing the chapter

### ~Feature :
20. [ ] Extension of existing Workflows is not possible
20. [ ] #469 Add an assistant to record and reteach recognizable parts
2. Implementation
The implementation phase is based on the interplay of issues and merge requests.
2.1 Modeling Sprints as Milestones
Sprints are a large topic on their one so we won’t go into detail here and just mention that you can represent sprints as milestones.
2.2 Assignee
If the issue is planned to be worked on the responsible developer is assigned, which means they are the owner and responsible for the lifecycle of the issue. If they would give up ownership of the issue by unassigning them they would be at least responsible for the issue not getting “lost”.
2.3 Working on an issue
If a developer starts working on an issue, they must
- (if not already done) assign them,
- Create a branch starting with their two-letter initials, like
ph/purposeOfTheBranch, - Open a new WIP merge request mentioning the issue to mark that it is currently being worked on,
- Assign themselves to the WIP merge request because they are currently responsible for it
When a commit in this merge request implements or fixes an issue, the commit message must contain “Closes #XYZ” with XYZ being the issue id. If a commit does not close an issue but is related to it, mention it in the message (“Related to #XYZ”, “Towards #XYZ” but avoid the auto close keywords described in the link above). This makes it directly obvious and reviewable which code lines deal with which issue.
A merge request may handle multiple issues at once but be aware that an MR can only be accepted or rejected as a whole. You have to balance between “every small issue has its own MR” (bad because of clutter, review overhead and CI load) and “putting dozens of issues in one massive MR” (also bad because reviewing is impossible).
2.3.1 Why starting with a merge request?
Opening a merge request even though you are not finished seems counter-intuitive at first. But as it is marked as WIP, the status is clear and there are many benefits:
- We have a nice overview about what is currently being worked on
- The developer (as they are assigned to the WIP MR) has it in their merge request list in the upper right of the Gitlab UI.
- The automated test results of our CI are easier available
- You can discuss with your colleagues and ask for feedback
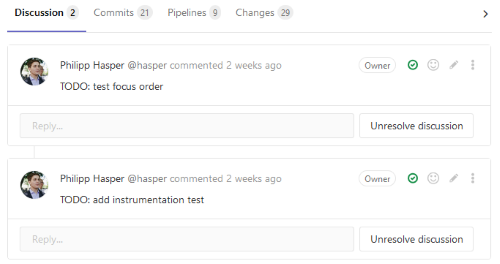
- You can use the discussion feature to note down TODOs. Because discussions block the merge request, they are not forgotten. For this, your Gitlab administrator has to configure Gitlab so it does not accept merge requests until all discussions are resolved as explained here.
2.4 Finishing an issue
If the issue is readily implemented
- Review the changes once more yourself to spot stuff like erroneously committed lines.
- If there are any points to double check, start a new discussion in the MR mentioning them.
- Discussions automatically block a MR so they are a powerful tool to make sure that nothing is overlooked.
- As explained above, you can also use the discussion feature earlier when working on the MR to write down open points not yet implemented.
- If your code contains important visual changes, adding some screenshots to the MR description can help the reviewer (and can be used later for the changelog).
- Remove the “WIP” prefix from the merge request.
- Add the label Needs Reviewto the merge request.
- Assign one of the maintainers to the MR. This will add the MR to their list to review:

Don’t close issues fixed in the MR manually as they will automatically be closed if the corresponding MR is accepted! If you don’t have a single commit where you could write “Closes #XYZ”, write this into the MR description which will also link issue and MR together.
3. Review
3.1 Needs Review
A merge request (MR) with the label - Go through the code changes and commits.
- If you are fully satisfied, continue with 3.3. If not, continue with the next steps.
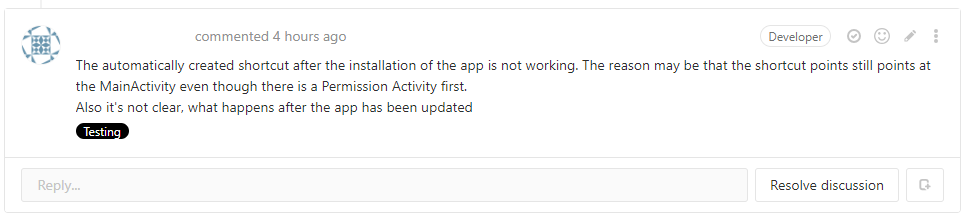
- If things need to be addressed, comment on the changed line in question or (if not related to a specific line) open up a new discussion below the MR. These discussions will block the MR until they are resolved.
- Remove label Needs Review
- Add label Needs Changes, comment (if not already done) which changes are necessary and assign the submitter or another developer to transfer ownership.
If a MR needs additional attention from the testing team, e.g. because of suspected side-effects:
- Assign a colleague from the testing team.
- Open a new discussion and explain which things have to be double-checked.
The testers then do the following:
- Test / review the patch manually. The CI pipeline pre-builts, which each of our projects has available, are useful for this.
- Comment the mentioned points on the discussion, add newly found problems with the MR as new discussion. One separate discussion for each problem so the discussion stays confined and can easily be converted to a separate issue by the maintainer.
- Afterwards, if problems were found, set the label Needs Changesand assign the developer. Else, set the labelNeeds Reviewand assign a maintainer again.
3.2 Needs Changes
A MR with the label - Comment on the respective discussions how you have addressed them and why you think they are resolved. In most cases, the discussions should then be resolved by the reviewer; only resolve them yourself if they are minor defects or blunders (e.g. “fix indentation” or “rename to XYZ”).
- Add label Needs Reviewand assign a maintainer again.
- Remove label Needs Changes
3.3 Accepting a merge request
If the continuous integration ran trough and all comments have been resolved by the reviewer, they can choose to merge in the MR overview page. To prevent accidential merges the Gitlab administrator should configure Gitlab to block merge requests whose pipeline failed as explained here.
You can directly trigger the following manual testing stage by adding the label4. Manual Testing
The management of manual test steps and protocols is done with TM4J, a Jira plugin. Gitlab might offer something comparable in the future but this is not available right now. If you don’t want to run Jira and Gitlab in parallel, you can always stick to Excel lists of step-by-step test instructions. We did exactly this in the beginning and all the following mechanics also apply there.
Issues and merge requests labeled withUnlike the others, this label comes into effect after the issue / MR is closed. The testing team regularly checks closed issues and MRs for this label and for each issue:
- If feasible and you have code access, write an automated test.
- Else, document a new manual test in TM4J.
- Add the TM4J test case URL to the issue.
- Remove the label Testingagain.
If during testing it turned out that the issue is not fully fixed
- Reopen the issue (and keep or add Testing).
- Comment on the issue what the problem is.
- Assign a maintainer (because it is important to quickly decide about the importance of the regression).
4.1 Define test cases for testing
The same mechanics can be used by a non-tester (i.e. developer or maintainer) to request future test cases for already existing (and fully working) functionality:
- Open an issue describing the features, how to use it and the interesting test aspects.
- Label it with TestingandFeature(or the appropriate labels).
- Directly close the issue.
4.3 Testing a Userstory
As explained in 1.1, user stories typically describe a broader picture usage scenario, formulated from a user perspective and are goal-driven. When testing them, a strict protocol is not required and maybe even harmful, as the tester should behave as “user-like” as possible, meaning always being focused on reaching a specific goal, not on specific steps.
User stories are converted to test cases by just linking to the corresponding issue, i.e. “Testing Userstory #123, import of external videos” and amended by reopening and rephrasing them, as explained in 1.1.
5. Done
A solid Definition-Of-Done i to be written down and agreed upon by your specific team. In our team, we emphasize the following aspects:
- Process documentation (Which issue was resolved by which commit? Which features / fixes did a merge request contain?)
- Testing (Preferably automatic, alternatively manual)
- Entry in the customer-facing New-and-Noteworthy document if applicable
6. Monthly Release
Definition and testing of a new monthly release is done as follows by the two roles “Maintainer” and “Tester”:
- Maintainer: Upload the version’s build artifacts to the preview folder on our release download portal. These artifacts must be taken from the build CI and must be merged into master to guarantee the release’s traceability.
- Maintainer: Create a new issue with the title
[release] Release protocol <version>(e.g.[release] Release protocol 20M4)- We have a Release Protocol issue template which contains all of the points in a check list.
- Add the release’s planning milestone to the issue.
- Add the download links from the first step to the issue.
- Add the label priority:highand assign a Tester.
- Maintainer: For every module (in our case e.g. the Android app, Hololens app, the visual editor,… ) ask the main responsible maintainer to run the manual “Sanity Check for Release” test cycle which is documented in TM4J
- These sanity checks are very short test runs (around three to ten minutes per module) which test absolute basics such as installation, server connectivity or up-/download.
- Having them executed by the maintainers instead of only the testers keeps both teams more aware of each other’s work.
- Sanity check errors are reported under the release protocol issue and immediately halt the release until they are resolved.
- Tester: Run the “Complete Testing” manual test plan and verify that no catastrophic failure has occured in their and the maintainer’s tests. Failures are reported in the release protocol issue.
- Tester: Assign back to the Maintainer.
- Maintainer (in case of failures): Fix / delegate the problems and comment on the release protocol issue. After all issues have been resolved again, the same procedure starts from the beginning by adding a new section to the release protocol with the same checklist but newer download links.
- Maintainter (in case of success): Move the preview software uploads to the actual release protocol, collect the New-and-Noteworthy document and publish both on the customer portal.
Conclusion
This post describes how we organize our day-to-day business at ioxp. I hope you can draw some inspiration and learnings if you are planning to design a process for your team. If you have questions or further suggestions, don’t hestitate and contact me.
The most important aspect if you want to implement such a process is the willingness to quickly adapt it shall the need arise or if the developers whish for it. After all, the process is only a tool not an end in itself. Processes help but results and happy co-workers matter.