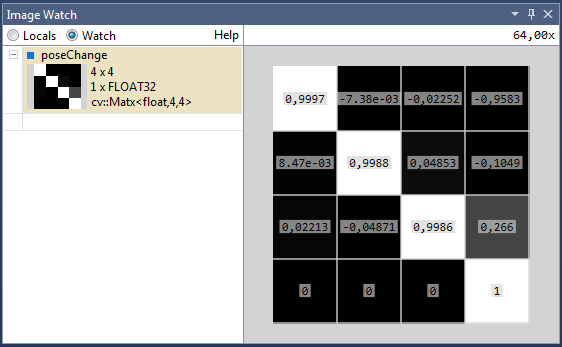
When developing for/with OpenCV using Visual Studio, the Image Watch plug-in is very useful. However, it does not support the better-typed cv::Matx types (e.g. cv::Matx33f which is the same as cv::Matx<float,3,3> ). Here is how I made use of Visual Studio’s debugger type visualizers to customize the plugin:
- Go to the folder
<VS Installation Directory>\Common7\Packages\Debugger\Visualizers\and create a new file calledMatx.natvis - Open the file and insert the following:
<?xml version="1.0" encoding="utf-8"?> <!-- Philipp Hasper, http://www.hasper.info--> <AutoVisualizer xmlns="http://schemas.microsoft.com/vstudio/debugger/natvis/2010"> <UIVisualizer ServiceId="{A452AFEA-3DF6-46BB-9177-C0B08F318025}" Id="1" MenuName="Add to Image Watch"/> <Type Name="cv::Matx&lt;*,*,*&gt;"> <UIVisualizer ServiceId="{A452AFEA-3DF6-46BB-9177-C0B08F318025}" Id="1" /> </Type> <Type Name="cv::Matx&lt;*,*,*&gt;"> <DisplayString Condition='strcmp("float", "$T1") == 0'>{{FLOAT32, size = {$T3}x{$T2}}}</DisplayString> <DisplayString Condition='strcmp("double", "$T1") == 0'>{{FLOAT64, size = {$T3}x{$T2}}}</DisplayString> <Expand> <Synthetic Name="[type]" Condition='strcmp("float", "$T1") == 0'> <DisplayString>FLOAT32</DisplayString> </Synthetic> <Synthetic Name="[type]" Condition='strcmp("double", "$T1") == 0'> <DisplayString>FLOAT64</DisplayString> </Synthetic> <Item Name="[channels]">1</Item> <Item Name="[width]">$T3</Item> <Item Name="[height]">$T2</Item> <Item Name="[data]">(void*)val</Item> <Item Name="[stride]">$T3*sizeof($T1)</Item> </Expand> </Type> </AutoVisualizer> - You do not even have to restart Visual Studio. Just start a new debugging session and you can look at your cv::Matx types in a nice little graphical window.

More about customizing the Image Watch plug-in can be found on the official Image Watch documentation page.
